We believe empowering engineers drives innovation.
We believe empowering engineers drives innovation.
Jeff Atwood writes, “It’s painful for most software developers to acknowledge this, because they love code so much, but the best code is no code at all.”, in his aptly titled article “The Best Code is No Code At All” from the archives of his popular blog “Coding Horror”.
In my own understanding of the statement, “The best code is no code at all”; the more code you write, the higher the opportunity for error. Less code means fewer bugs, lower complexity, and a lower cost associated with the ownership and maintenance of the software.
Over the years I’ve used numerous technologies, practices, and behaviors to better conform to the “write less code” sentiment. One of the more useful and effective tools I’ve adopted in more recent years is the Custom User Snippet feature of the popular Visual Studio Code(VSCode) editor.
Code snippets are small portions of re-usable code. VSCode’s implementation of code snippets leverages a json template to define the body of the code snippet, provide a description, and designate a trigger to perform an insertion of the snippet’s code at the cursor’s current position within editor using only a few keystrokes.
In the remainder of this article we’ll explore how to create and use custom user snippets to make fewer mistakes, improve productivity, and ultimately, write less code.
Once you’ve identified code that is a good candidate for use as a snippet, you can follow the steps below to turn it into a custom user snippet.
I’m working with release 1.74.3 of the Visual Studio Code editor. Older or newer versions of the editor may not work with the referenced commands and configuration options. If this is the case I recommend upgrading your version of the editor and/or referencing the official documentation associated with your chosen version of VSCode.
The first step to creating custom user snippets in VS Code is opening the Snippets Editor. The easiest way to access the Snippets Editor is via the Command Pallette. Open the Command Palette by pressing Ctrl+Shift+P in Windows and Linux, or Cmd+Shift+P for macOS; and type “Snippets: Configure User Snippets”. Select the language you want to create a snippet for (HTML, CSS, JavaScript, Python, etc…) or click “New Global Snippets File” if you would like the snippet to be accessible in any type of file or document. This will open a new or existing json configuration file where you can define your custom snippets.
With your snippets configuration file opened in the Snippets Editor, it’s time to create a new snippet. Each snippet is defined using json and composed of a name, a prefix trigger, an optional description, and a body. The name is a logical identifier for the snippet in the VSCode snippet menu. The prefix trigger is the keyword you will type in the editor to activate the snippet. The body is the code that will be inserted at your cursor upon triggering the snippet.
Here is an example of a basic HTML snippet:
"Basic HTML doc": {
    "prefix": "html",
    "body": [
        "<!DOCTYPE html>",
        "<html>",
        "<head>",
        "<title>${1:title}</title>",
        "</head>",
        "<body>",
        "${2:body}",
        "</body>",
        "</html>"
    ],
    "description": "A basic template for a HTML document"
}
In the example above, the snippet’s name is Basic HTML, the prefix trigger is html, and the body of the snippet is a list of strings representing the line by line contents of a basic HTML document. The example snippet has two placeholders that allow values to be inserted into the snippet following invocation.
After you have created your snippet, you will need to save it to make it usable within the editor. Click on “File” in the top menu and select “Save”, or press Ctrl+S in Windows and Linux or Cmd+S in macOS. The snippet should now be saved in your selected configuration file and usable within VSCode.
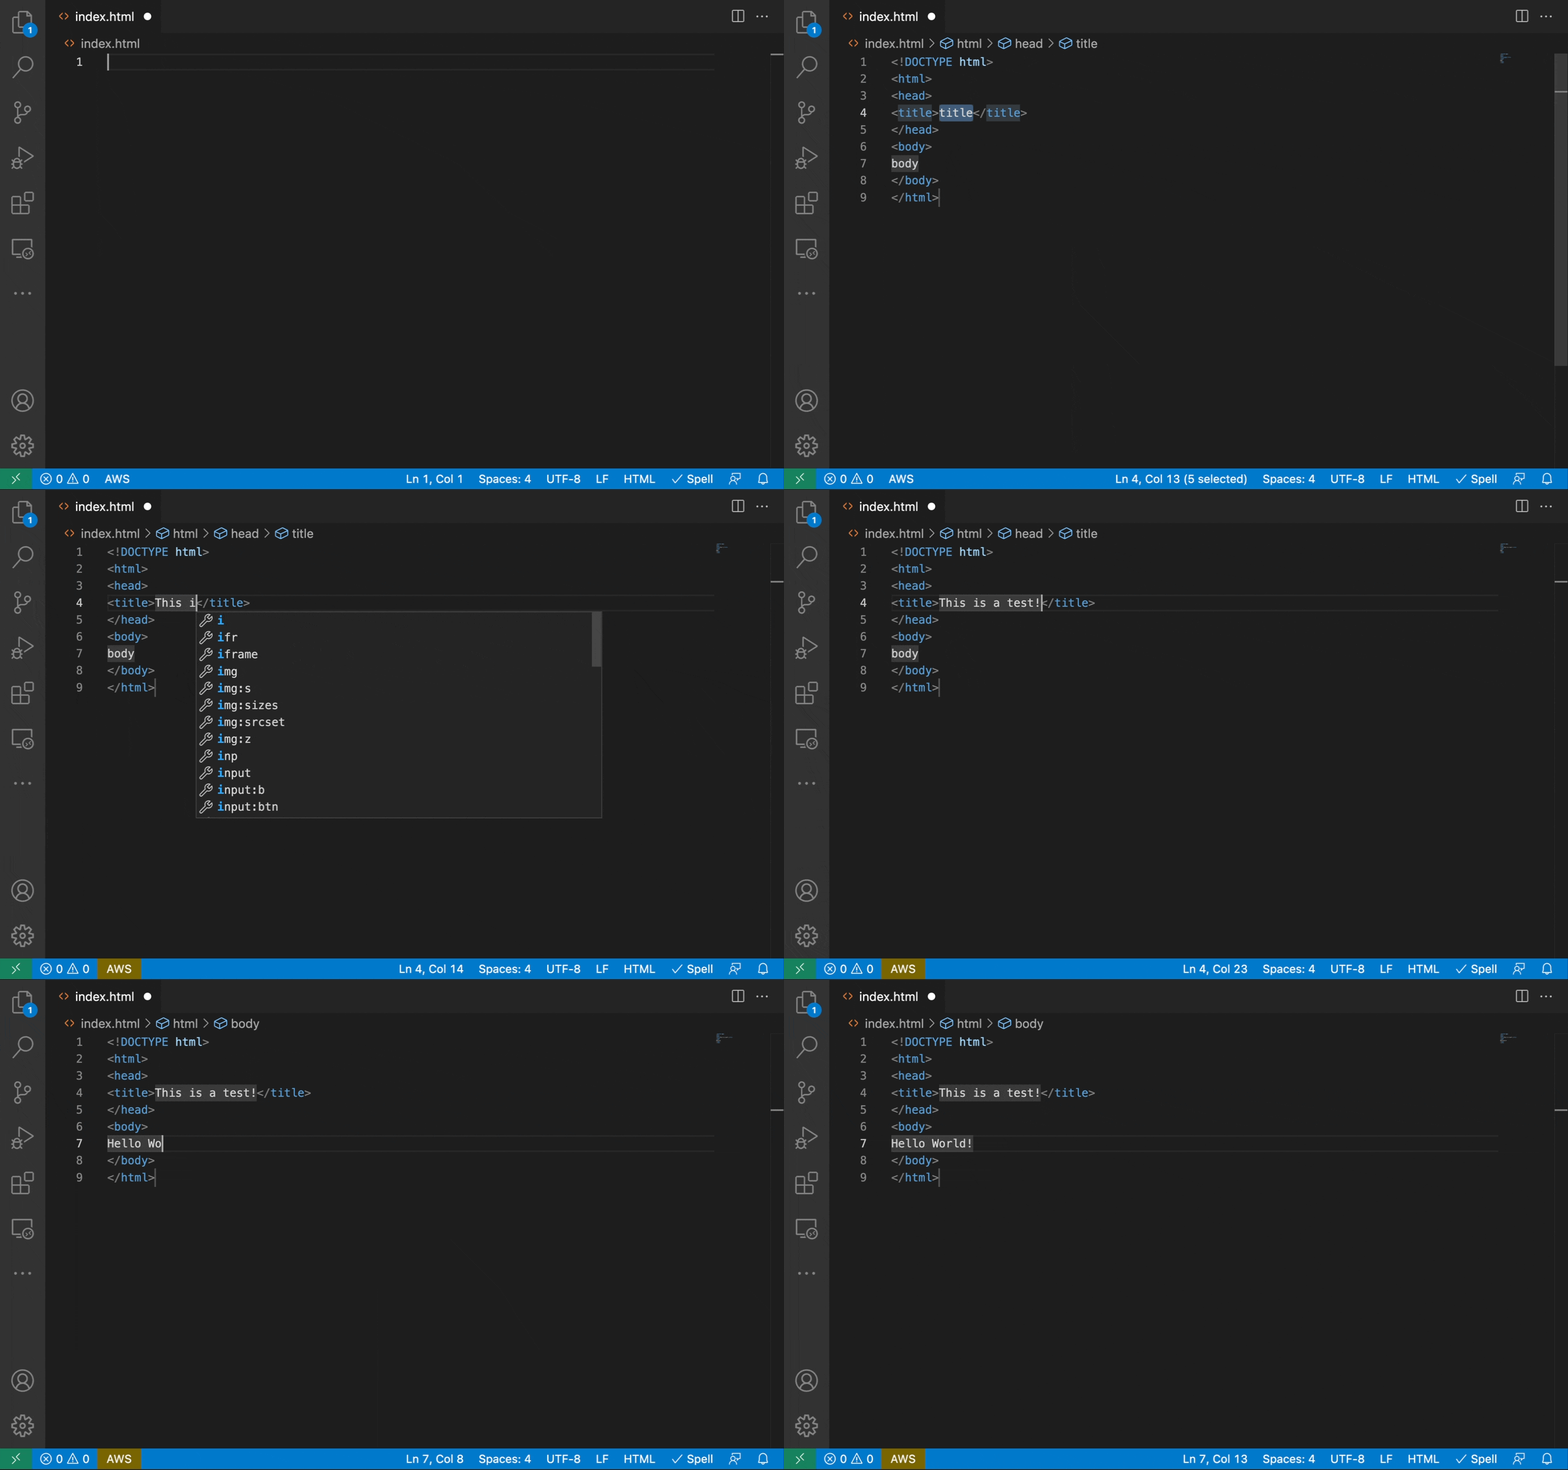
Upon saving this snippet, whenever you type the “html” prefix trigger into your editor and press Tab, the body of the snippet will be inserted at your cursor, while your cursor’s current position will be moved to the location of the first placeholder defined in your snippet: ${1:title}. Now you will be able to enter a string to represent the title and hit Tab to advance to the next placeholder of ${2:body}, where you can type the contents of the document’s body.
Let’s assume we want to use our snippet to create an HTML document with the following values:
title: “This is a test!”body: “Hello World!”Here is an example of invoking the snippet with the above referenced values:

VSCode’s user snippets are a powerful tool that can save time, improve quality, and increase productivity; all while helping you to write less code. In this article we’ve only scratched the surface on what can be done with user snippets. Personally, I use snippets to quickly generate a significant amount of boilerplate code for numerous purposes:
I encourage you to dive deeper and spend time reviewing the official documentation, take advantage of generators like Pawel Gyzbek’s snippet-generator.app to quickly create new snippets from existing code, and use/contribute to our collection of custom user snippets.
💡 Not a VSCode User? Checkout this list of editors and IDEs and their features that provide similar functionality as Custom User Snippets:
- Atom Snippets: https://github.com/atom/snippets
- Sublime Text Snippets: https://docs.sublimetext.io/guide/extensibility/snippets.html
- JetBrains IntelliJ IDEA Live Templates: https://www.jetbrains.com/help/idea/using-live-templates.html
- JetBrains PyCharm Live Templates: https://www.jetbrains.com/help/pycharm/using-live-templates.html#live_templates_types
- JetBrains WebStorm Live Templates: https://www.jetbrains.com/help/webstorm/using-live-templates.html